Integrating Sitecore with Salesforce: Data Exchange Framework & Sitecore Upgrades Pitfalls

Introduction:

In today’s digital landscape, seamless integration between Customer Relationship Management (CRM) systems and Content Management Systems (CMS) is crucial for delivering personalized and cohesive customer experiences. One powerful combination is the integration of Sitecore, a leading CMS, with Salesforce, a widely used CRM platform. The Data Exchange Framework (DEF) plays a pivotal role in making this integration smooth and efficient.

Understanding the Data Exchange Framework (DEF):

The Data Exchange Framework is a versatile and extensible framework provided by Sitecore for integrating and synchronizing data between different systems. It facilitates the exchange of data between Sitecore and external systems, making it an ideal solution for connecting with Salesforce.

Key Components of Data Exchange Framework:

  1. Providers:
    • Sitecore Providers: These enable communication with Sitecore databases.
    • Endpoint Providers: These facilitate communication with external systems like Salesforce.
  2. Pipeline Batches:
    • A set of pipelines organized into batches that define the flow of data between systems.
  3. Pipelines:
    • Customizable workflows that process and transform data during integration.
  4. Value Accessors:
    • Components that extract or set values during the data exchange process.
  5. Value Readers/Writers:
    • Responsible for reading and writing values during the exchange.

Integrating Sitecore with Salesforce using DEF:

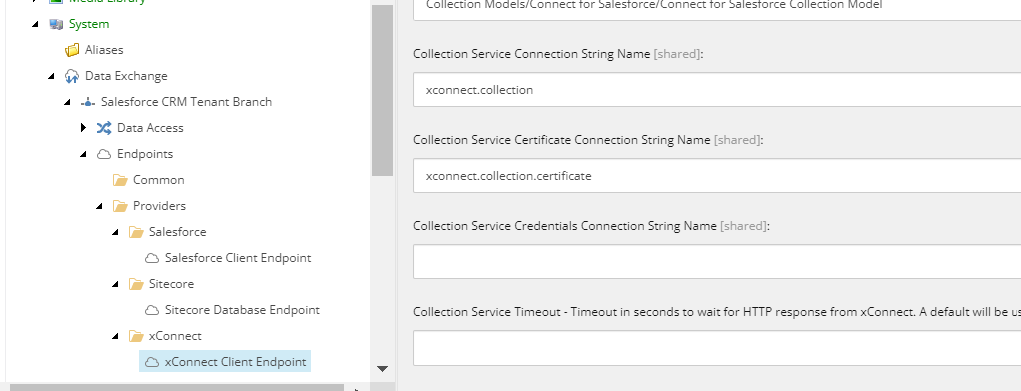
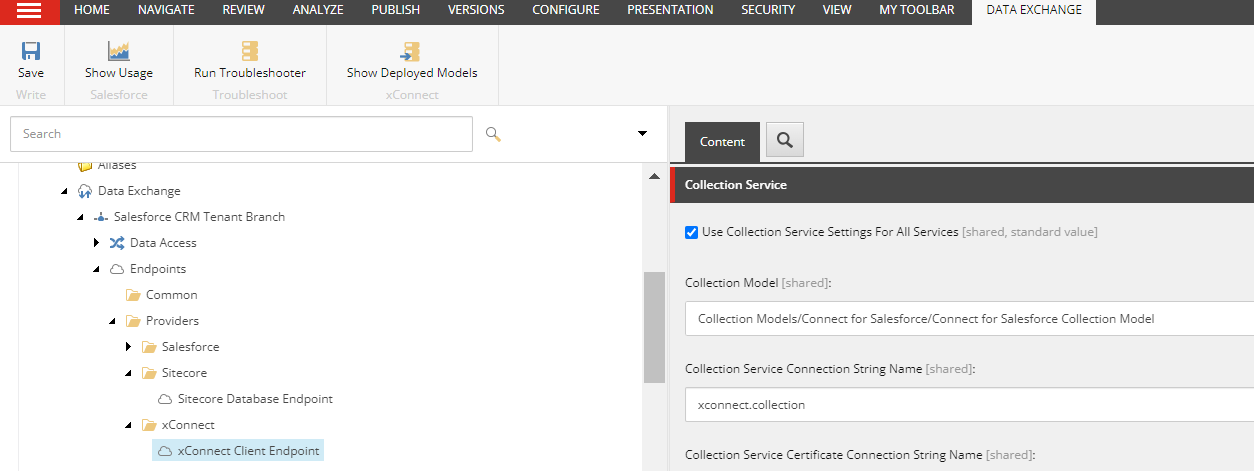
  1. Set Up Salesforce Endpoint Provider:
    • Configure the Salesforce endpoint provider to establish a connection between Sitecore and Salesforce.
  2. Define Data Exchange Processes:
    • Create pipeline batches and pipelines to define the data exchange processes. Specify the data flow, transformation logic, and mapping between Sitecore and Salesforce entities.
  3. Map Data Models:
    • Define data models in both Sitecore and Salesforce, and create mappings to ensure that data is correctly synchronized between the two systems.
  4. Configure Value Accessors:
    • Use value accessors to extract and set values during data exchange. Customize them according to the specific requirements of your integration.
  5. Implement Synchronization Processes:
    • Write custom code or use existing connectors to synchronize data between Sitecore and Salesforce. Leverage DEF pipelines to orchestrate the synchronization process.
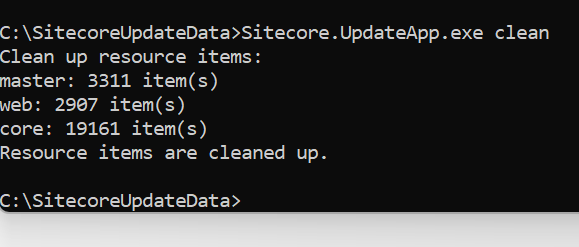
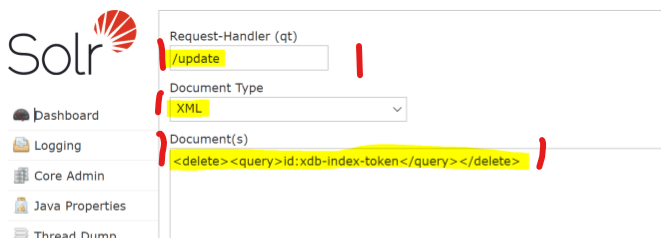
  6. Troubleshooting and Diagnostic: Sitecore logs play a crucial role here and luckily makes the troubleshooting and debugging fairly simple
  7. Testing and Validation:
    • Thoroughly test the integration to ensure that data is accurately exchanged between Sitecore and Salesforce. Validate that the synchronization processes work as expected.
  8. Monitoring and Maintenance:
    • Implement monitoring mechanisms to track the performance of the integration. Set up alerts for any potential issues and establish a maintenance plan for updates and enhancements.

Benefits of Sitecore-Salesforce Integration:

  1. 360-Degree Customer View:
    • Combine customer data from Sitecore and Salesforce to create a comprehensive view of customer interactions and preferences allowing to Sync Sitecore Interactions to Salesforce and Salesforce customer data to Sitecore XDB data for personalisation
  2. Personalized Content Delivery:
    • Leverage CRM data to deliver personalized content through Sitecore, enhancing user engagement and satisfaction.
  3. Marketing Automation:
    • Enable marketing automation by synchronizing lead and campaign data between Sitecore and Salesforce.
  4. Efficient Sales Processes:
    • Streamline sales processes by providing sales teams with up-to-date customer information from Sitecore and Salesforce.

Use cases that I have configured succesfully and first steps configuring the Connector:

  1. Install the correct version of Data Exchange framework (matching your sitecore version) https://dev.sitecore.net/Downloads/Data_Exchange_Framework.aspx
  2. Install the correct version of your Salesforce data Exchange Framework connector (matching data exchange framework and sitecore version) This will install a bunch of dll, configs, sitecore items and XDB models.
  3. Configure Salesforce connection string in your connectionstrings.config (note that sandbox is reccomended for non prod env
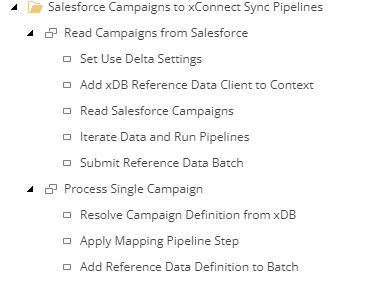
<add name="SFCRM" connectionString="User Id=svc_slsfrc_sitecore_user@XXXXXcom.uat;Password=xxxx;Security Token=XXXXXXXXXXXXXX;client id=xxxx;secret key=xxxx;Sandbox=true" />

  1. Salesforce Campaign Syncronization basically copying Salesforce campaigns on Sitecore (this step is partic

Key take away: Salesforce Campaigns has nothing to do with Sitecore XP campaigns and Salesforce Campaigns are stored in the Reference Data database. The main reason to run this Sync is to Get the campaign data to configure Sitecore Personalisation rule based on the Salesforce Campaigns an user may be enrolled in

2. Salesforce Sync with XDB Contacts basically keeping in Sync Salesforce with Sitecore so that you can run personalisation rules on your XDB Contact using Salesforce data, obviously you need to have a key to match and syncronise Contacts between Sitecore and Salesforce

Note that if you have configured a custom XDB model you may need to include this for your mapping purposes.

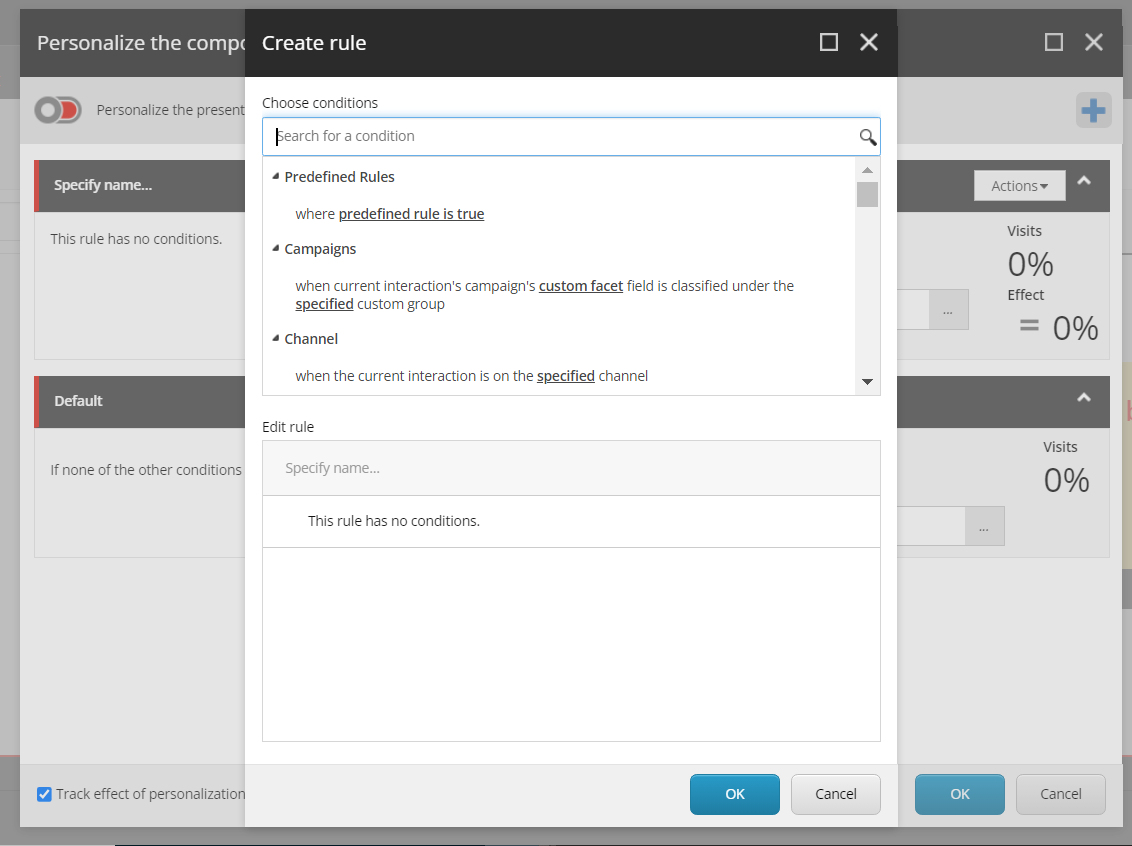
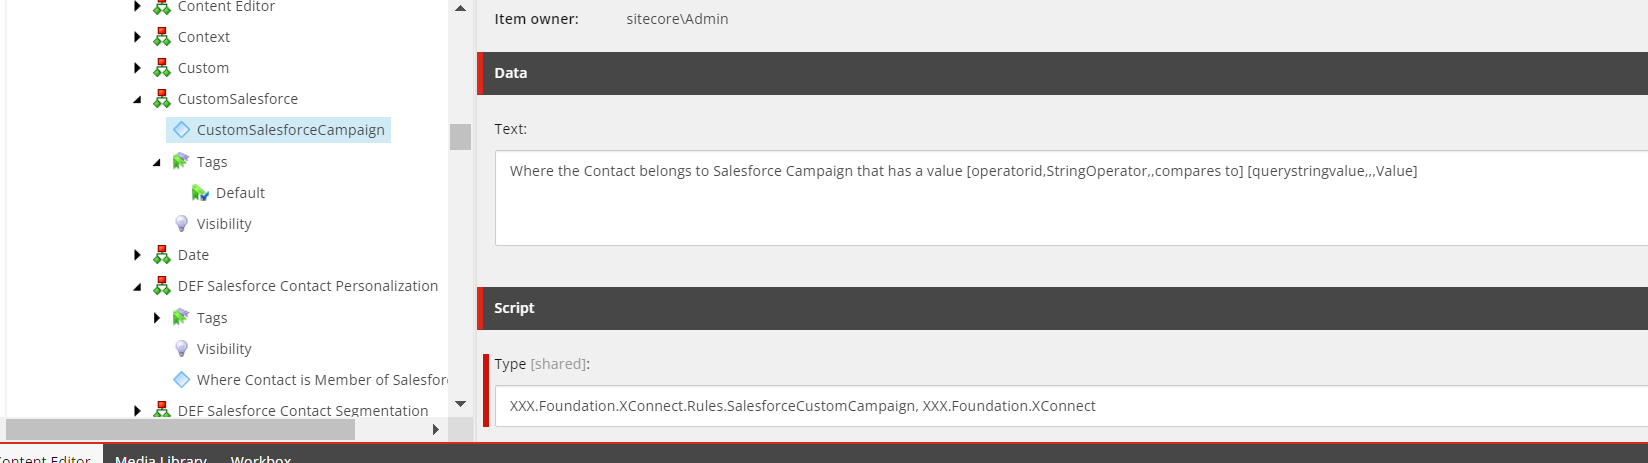
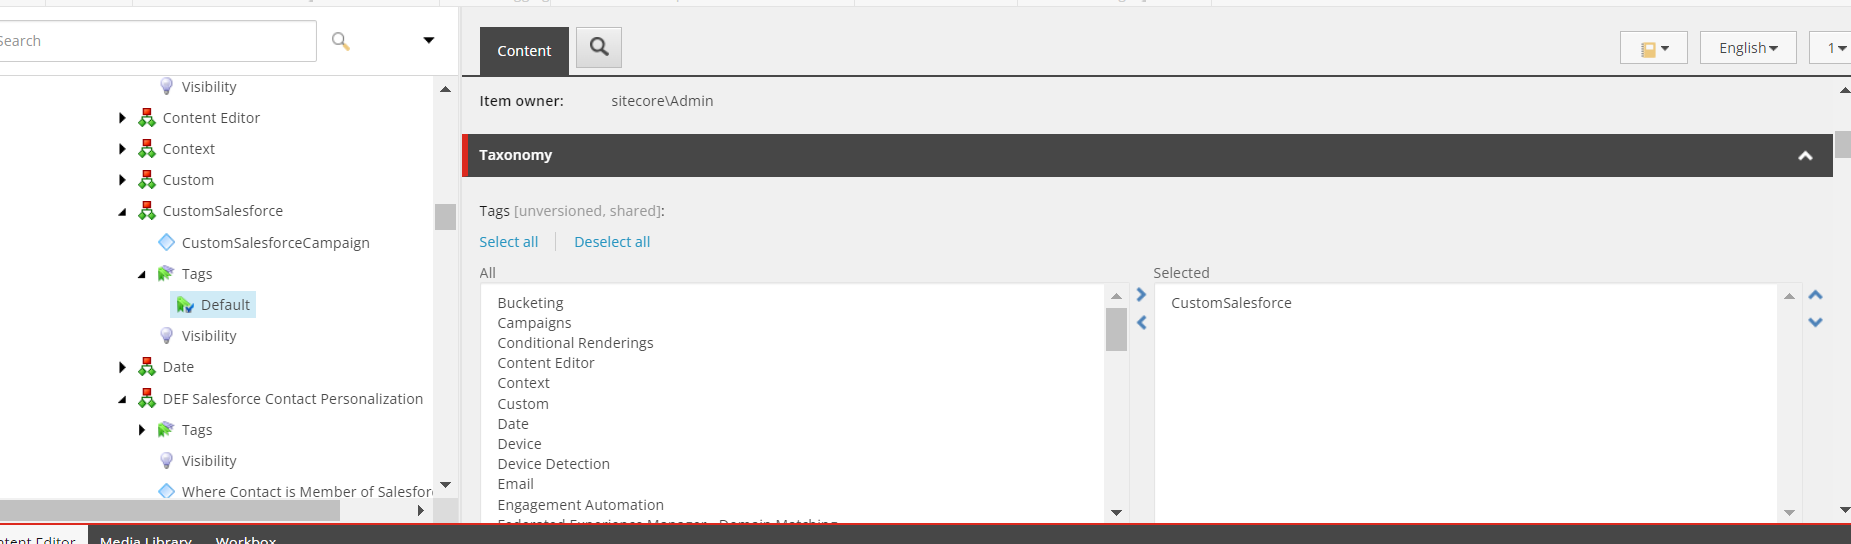
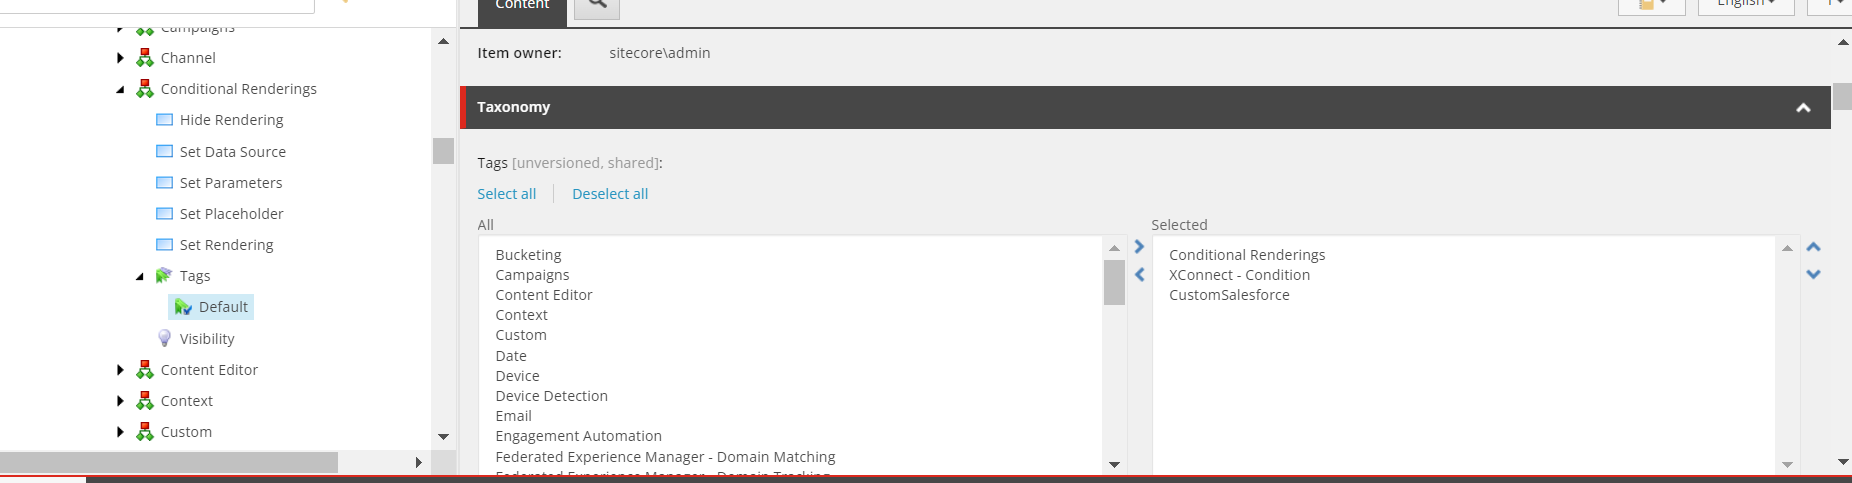
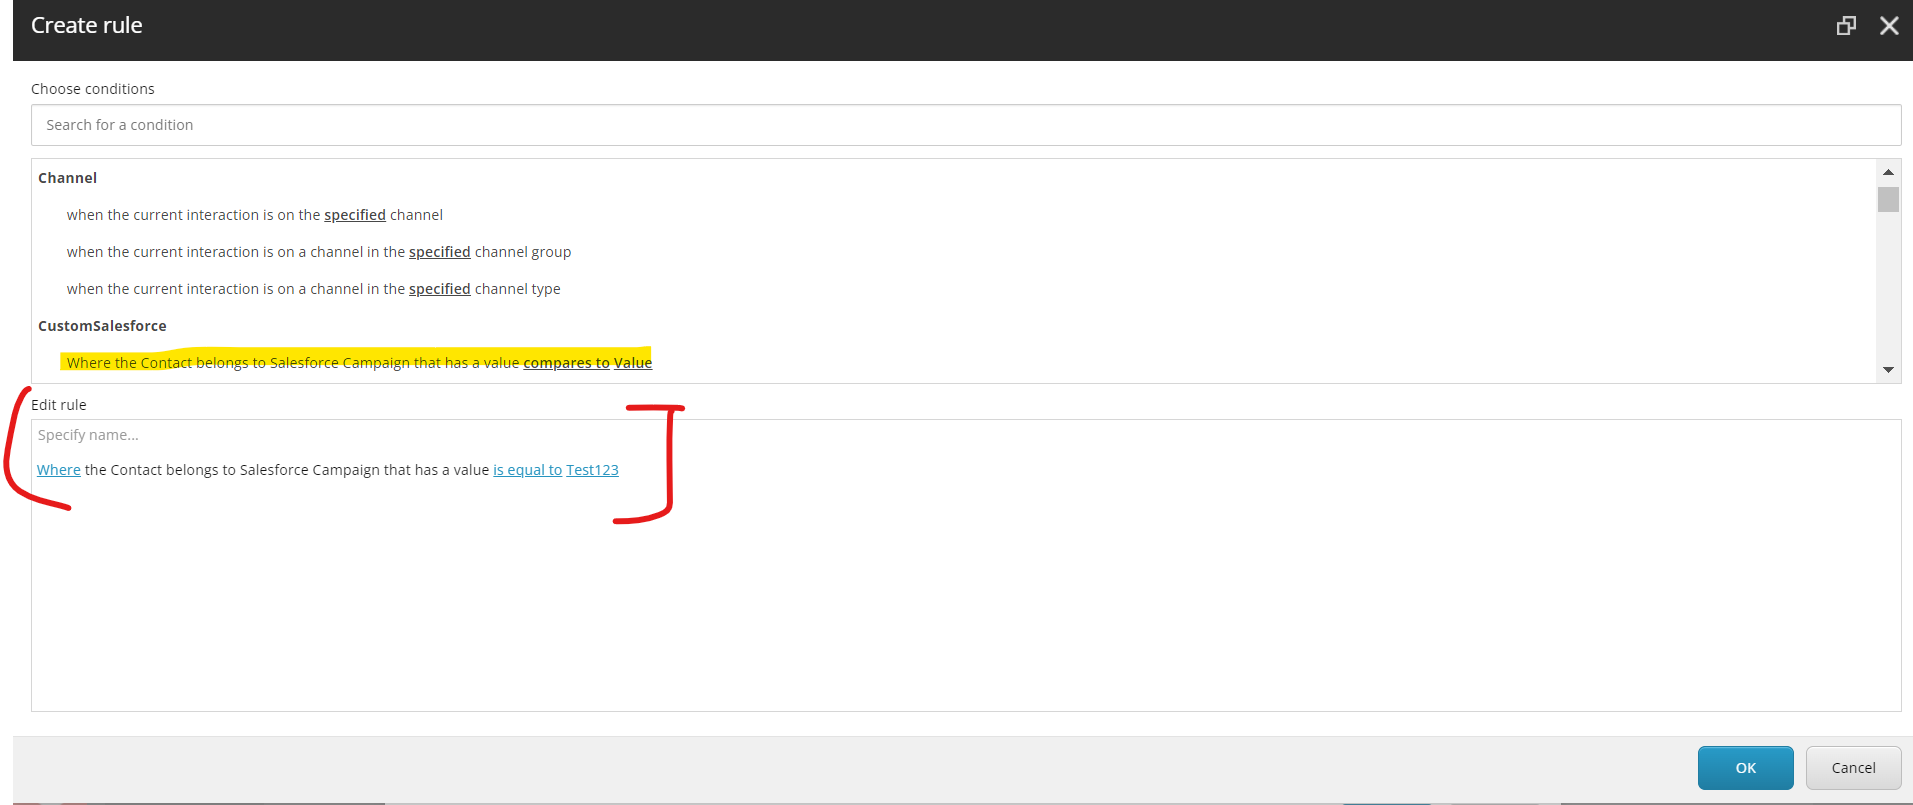
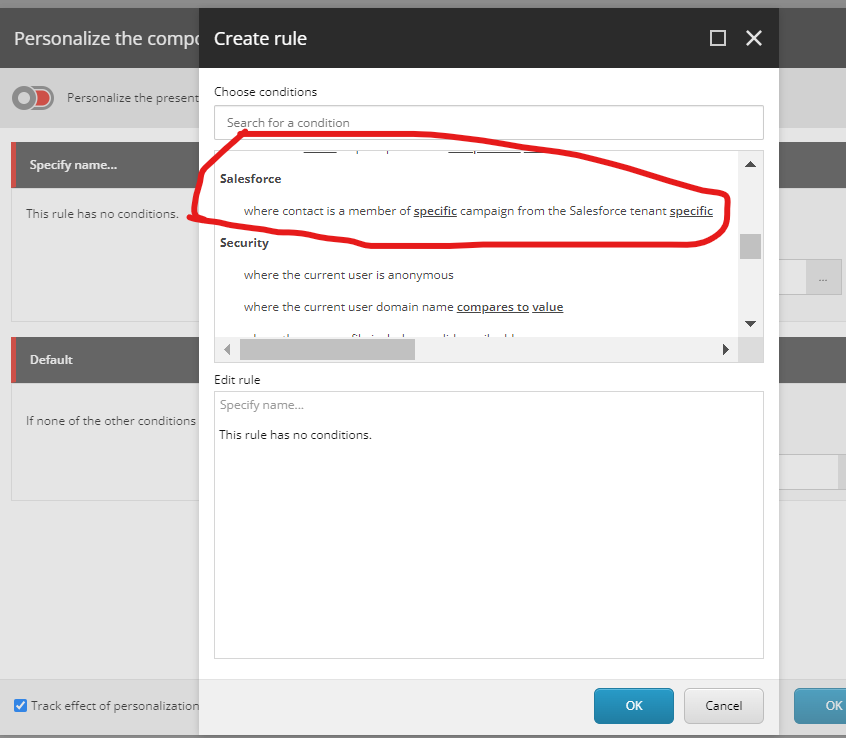
3. Salesforce personalisation rules based on XDB contact data

this last element will make the magic allowing Editors to configure business rules to deliver personalised Content to your users based on business rules to evaluate your business logic on the data stored in Salesforce. Eg. Show red button with a personalised TEXT to all the users that are marked as Leads on Salesforce or are enrolled in a specific Salesforce campaign.

Sitecore Upgrade Pitfalls

So far everything looks good and smooth, but in the reality you may need to face minor issues when upgrading between Sitecore versions that will force you to upgrade your Salesforce integration, here is my reccomendation, be patient and read the upgrade guide for specific version upgrades…. Other reccomendation is not to jump too many versions (if it is possible) to have a smoother upgrade path eg. Sitecore 9.3 – 10.x but if you want to migrate from Sitecore 8 or 9.1 to 10.x would be more traumatic…

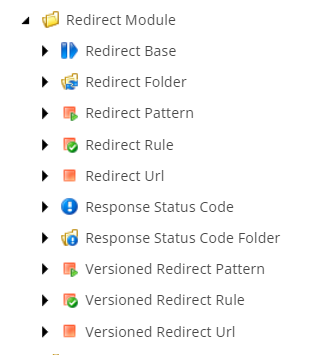
Within my Sitecore Upgrades experience, you will have to remap and adjsut some templates within your customisation of the Data Excahange framework but nothing dramatic, just a bit of patience and willingness to validate and test the Pipelines batch and logs… Other element to keep in mind is the XDB and Reference Data upgrade that needs to be migrated if you expect data to be in place once you upgrade your sitecore version.

XM Cloud, CDP, Sitecore Connect

If your sitecore instance is already in the Composable DXP stack mode, probably Sitecore Connect with CDP, Sitecore Personalise and XM Cloud are more appropriate than Data Exchange framework….

Conclusion:

Integrating Sitecore with Salesforce using the Data Exchange Framework empowers organizations to deliver seamless, personalized experiences by combining the strengths of a robust CMS and a powerful CRM. By following the steps outlined in this guide, businesses can establish a reliable and efficient connection between Sitecore and Salesforce, unlocking the full potential of their customer data for improved marketing, sales, and overall customer satisfaction.

Sitecore database clean up for IAR upgrade

Introduction

Sitecore provides the Sitecore Update Application (SitecoreUpdateApp.exe), as a crucial component for managing and updating Sitecore instances.

Understanding SitecoreUpdateApp.exe

SitecoreUpdateApp.exe is a command-line tool designed to simplify the process of updating Sitecore installations. It plays a vital role in keeping your Sitecore environment up-to-date with the latest patches, updates, and feature enhancements. By leveraging this tool, administrators can efficiently manage the deployment of Sitecore updates across different environments.

Key Features

1. Efficient Update Deployment:

SitecoreUpdateApp.exe streamlines the update process by automating many of the manual steps involved. This includes tasks such as backing up databases, deploying files, and applying configuration changes.

2. Compatibility Checks:

Before applying updates, SitecoreUpdateApp.exe performs compatibility checks to ensure that the update is suitable for the specific Sitecore version and configuration. This helps prevent potential issues and ensures a smooth update process.

3. Rollback Capability:

In the event of an issue during the update process, SitecoreUpdateApp.exe provides a rollback mechanism. This allows administrators to revert to the previous state, minimizing downtime and potential disruptions to the website.

4. Customization Options:

SitecoreUpdateApp.exe offers various customization options through command-line parameters, allowing administrators to tailor the update process to their specific requirements. This includes options to skip certain steps, apply updates silently, or specify target environments.

How to Use SitecoreUpdateApp.exe

Using SitecoreUpdateApp.exe involves executing commands through the command prompt. Here is a basic guide on how to use the tool:

1. Open Command Prompt:

Open the command prompt on the server where Sitecore is installed.

2. Navigate to SitecoreUpdateApp.exe Directory:

Use the cd command to navigate to the directory where SitecoreUpdateApp.exe is located.

3. Execute Update Command:

Run the update command with the necessary parameters. For example:

   SitecoreUpdateApp.exe -n "Sitecore Experience Platform 10.1.0 rev. 004842" -p "C:\Path\To\Update\Package.zip"

4. Follow On-screen Instructions:

The tool may prompt for additional information or confirmation during the update process. Follow the on-screen instructions to proceed.

5. Monitor Progress:

Monitor the command prompt for progress updates and any potential error messages.

Best Practices

To ensure a successful update using SitecoreUpdateApp.exe, consider the following best practices:

1. Backup Your Sitecore Instance:

Before initiating any updates, always create a full backup of your Sitecore instance, including databases and files.

2. Review Release Notes:

Thoroughly review the release notes of the update package to understand the changes and potential impacts on your environment.

3. Test in a Staging Environment:

Test the update in a staging environment before applying it to the production environment. This helps identify and address any issues before they impact the live site.

4. Check System Requirements:

Ensure that your Sitecore instance meets the system requirements specified in the update package documentation.

5. Keep Customizations in Mind:

If you have customizations or third-party modules, consider their compatibility with the update. Update custom code and modules accordingly.

Alternatives to consider

SitecoreUpdateApp.exe is not your only option to clean up your database in preparation of the IAR migration and personally it comes to my rescue the Sitecore Power shell utilities written by Marteen this approach remove the specific sitecore item starting from the IAR files that you select….

Conclusion

SitecoreUpdateApp.exe is a powerful tool that simplifies the process of updating Sitecore instances, ensuring that your digital experience platform stays current and secure. By following best practices and leveraging the capabilities of this tool, administrators can confidently manage updates and deliver a seamless and reliable digital experience to their users.

Navigating Sitecore Upgrade: A Guide to upgrade database from Sitecore 9 to Sitecore 10

Introduction:

Sitecore, a leading digital experience platform, continually evolves to offer enhanced features and performance. Upgrading from Sitecore 9 to Sitecore 10 is a significant step in staying abreast of the latest advancements. In this blog post, we’ll focus on a crucial aspect of this transition: upgrading your databases. Follow this comprehensive guide to ensure a smooth and successful database upgrade.

Step 1: Understand Database Changes in Sitecore 10 and related modules in use… Before diving into the upgrade process, it’s essential to understand the database changes introduced in Sitecore 10. Review the official Sitecore documentation, specifically the release notes and upgrade guides, to gain insights into any schema changes, data migrations, or new features related to databases. Best starting point is Sitecore official documentation https://doc.sitecore.com/xp/en/developers/installation-and-upgrade-guides the Upgrade guide will contain detailed steps to your target Sitecore version and from the version from wich you are upgrading… Be aware that less Sitecore modules and hotfixes you have in place, easier will be your life since each of the modules may have a different upgrade path and may impact the data / items schema and require further rework, adaptation and test….

Step 2: Backup Your Databases Begin the upgrade process by creating comprehensive backups of your Sitecore databases. This includes the Core, Master, Web, and any custom databases associated with your Sitecore instance. Having reliable backups is crucial in case of unforeseen issues during the upgrade, allowing you to roll back to the previous state without data loss.

Step 3: Update Sitecore Databases Follow the step-by-step instructions provided in the Sitecore upgrade documentation to update your databases. This process may involve running scripts, executing database schema changes, and migrating data to align with the requirements of Sitecore 10. Pay close attention to any specific instructions related to database upgrades to ensure accuracy.

IAR Revolution

within Sitecore 10, Sitecore introduced IAR – https://doc.sitecore.com/xp/en/developers/103/developer-tools/items-as-resources-plugin.html IAR files are a great improvement to simplify and facilitate future sitecore upgrades, but it requires you to run few steps for cleaning up your Sitecore 9 databases from old Sitecore items and to leverage new Sitecore IAR

SQL migration scripts to review and run as per Upgrade guide:

CMS_core

CMS_core_master_web_9x

CMS_master.sql

CMS_security.sql

CMS_web.sql

SXP_collection_GrantPermissions.sql(Run on both Shard0 and Shard1 databases)

SXP_collection_Part1.sql (Run on both Shard0 and Shard1 databases)

SXP_collection_Part2.sql (Run on both Shard0 and Shard1 databases)

SXP_experienceforms_filestorage.sql

SXP_experienceforms_storage.sql

SXP_marketingautomation.sql

SXP_processing_engine_tasks.sql

SXP_reporting.sql

SXP_reporting_migrate_experience_optimization_data.sql

XDB Migration

depending on the version upgrade that you are targeting this maybe easier or more complex, in the best case scenario you will have to just run sql upgrade scripts and point the upgraded databases to the XDB index role and rebuild the XDB index….

Sitecore Reporting database rebuild

Within my personal experience, it has always been required to rebuild reporting database after a major Sitecore upgrade in case you have been using Sitecore analytics. This task can be easy or probelmatic depending on the data quantity/quality that you have on your XDB instance & reference data…

Step 4: Verify Data Integrity After upgrading the databases, conduct thorough data integrity checks to ensure that all content, configurations, and user data have been successfully migrated. This step is critical in maintaining the continuity of your digital experience, and any discrepancies should be addressed promptly.

Step 6: Test Database Functionality Perform extensive testing on your upgraded databases to validate their functionality. Test content management operations, content delivery, personalization, and any custom functionalities that rely on the databases. Address and resolve any issues that may arise during testing to guarantee a seamless transition to Sitecore 10.

Step 7: Update Connection Strings and Configuration Files Update the connection strings in your Sitecore configuration files to point to the upgraded databases. Ensure that all configuration files are aligned with the requirements of Sitecore 10. This step is crucial in maintaining a coherent and secure environment post-upgrade.

Step 8: Document Custom Database Configurations If you have custom database configurations or additional databases beyond the standard Sitecore databases, document these configurations. Ensure that any custom scripts or procedures associated with these databases are compatible with Sitecore 10, and make the necessary adjustments to accommodate the changes.

Conclusion: Upgrading databases from Sitecore 9 to Sitecore 10 is a pivotal step in the overall upgrade process. By following this guide and leveraging the resources provided in the official Sitecore documentation, you can navigate the database upgrade with confidence. Stay vigilant during each step, perform thorough testing, and be prepared to address any issues that may arise. A successful database upgrade is key to unlocking the full potential of Sitecore 10 and delivering an enhanced digital experience for your users.

Understanding Redirects in Sitecore Headless with .NET Core Rendering Host

Introduction

In the ever-evolving realm of web development, Sitecore Headless has emerged as a powerful solution for crafting seamless digital experiences. With the integration of .NET Core Rendering Host, developers can harness the flexibility and efficiency of headless architecture. One crucial aspect of this synergy is the management of redirects, a fundamental mechanism for guiding users through the digital landscape. In this blog post, we’ll delve into the intricacies of redirects in Sitecore Headless within a .NET Core Rendering Host.

Understanding Sitecore Headless:

Sitecore Headless represents a paradigm shift in web development, decoupling the front end from the back end to enable greater flexibility and scalability. It allows developers to create content-rich applications by consuming data from Sitecore, a leading content management system (CMS), and presenting it through various channels without being bound to a specific front-end technology.

The Role of .NET Core Rendering Host:

.NET Core Rendering Host serves as the bridge between Sitecore and the front-end application, enabling seamless communication and data exchange. It empowers developers to build dynamic, content-driven websites using the technology stack of their choice while leveraging the robust features of Sitecore.

Redirects: Navigating the Digital Landscape:

Redirects play a pivotal role in shaping user journeys within a website. They ensure that visitors are directed to the appropriate content, enhancing user experience and optimizing the flow of information. In a headless architecture, redirects take on a nuanced role, requiring careful consideration for efficient implementation.

Types of Redirects in Sitecore Headless:

  1. 301 Permanent Redirects:
    • Ideal for cases where content has permanently moved.
    • Ensures search engines update their indexes accordingly.
  2. 302 Temporary Redirects:
    • Used when content has temporarily moved or is under maintenance.
    • Does not impact search engine indexes as significantly as a 301 redirect.
  3. Wildcard Redirects:
    • Offers the ability to redirect multiple URLs using a wildcard pattern.
    • Useful for managing dynamic content changes or restructuring.

Implementing Redirects in .NET Core Rendering Host:

  1. Sitecore.ContentSearch.Pipelines.HttpRequest.RedirectResolver:
    • Leverage Sitecore’s RedirectResolver to manage redirects efficiently.
    • Customize the resolver to suit specific project requirements.

As an alternative option and a common scenario within your Sitecore upgrade / migration, you can consider leveraging the evergreen Sitecore redirect module… Redirect Module bring to the table the Templates to handle your redirects structure such as:

and you can explore more about it from the github repo and shared source project here:

https://github.com/thecadams/301RedirectModule

using SharedSource.RedirectModule.Classes;
using SharedSource.RedirectModule.Helpers;
using Sitecore.Data;
using Sitecore.Data.Items;
using Sitecore.Links;
using Sitecore.Rules;
using System;
using System.Collections.Generic;
using System.Text.RegularExpressions;
namespace XXXX.Foundation.Redirect.Pipelines.GetRedirectUrl
{
public class GetRedirectUrlProcessor
{
protected readonly IRedirectRepository RedirectRepository;
public GetRedirectUrlProcessor()
{
RedirectRepository = new RedirectRepository();
}
public void Process(GetRedirectUrlArgs args)
{
// Check for exact matches – priority over pattern matches.
if (Sitecore.Configuration.Settings.GetBoolSetting(Constants.Settings.RedirExactMatch, true))
{
args = CheckForDirectMatch(args.Database, args.RequestUrl, args.RequestPath, args);
if (!string.IsNullOrEmpty(args.RedirectUrl) || args.RedirectItem != null)
{
return;
}
}
// Next, we check for pattern matches because we didn't hit on an exact match.
if (Sitecore.Configuration.Settings.GetBoolSetting(Constants.Settings.RedirPatternMatch, true))
{
args = CheckForRegExMatch(args.Database, args.RequestUrl, args.RequestPathAndQuery, args);
if (!string.IsNullOrEmpty(args.RedirectUrl) || args.RedirectItem != null)
{
return;
}
}
// Rule matches prioriity on pattern match.
if (Sitecore.Configuration.Settings.GetBoolSetting(Constants.Settings.RedirRuleMatch, true))
{
args = CheckForRulesMatch(args.Database, args.RequestUrl, args.RequestPathAndQuery, args);
}
}
private bool IsMediaDirectMatch(string incomingUrl, string toMatchUrl)
{
if (incomingUrl == toMatchUrl)
{
return true;
}
if (toMatchUrl.StartsWith("sitecore/media library/"))
{
toMatchUrl = toMatchUrl.Replace("sitecore/media library", "/-/media");
}
if (!toMatchUrl.StartsWith("/-/media"))
{
return false;
}
if (incomingUrl == toMatchUrl)
{
return true;
}
// lastly, try matching by stripping extension and query string params
var regex = @"^(.*?)(\.[\w]{3,4}([?].+)?)?$";
var left = (Regex.IsMatch(incomingUrl, regex)) ? Regex.Match(incomingUrl, regex).Groups[1].Value : incomingUrl;
var right = (Regex.IsMatch(toMatchUrl, regex)) ? Regex.Match(toMatchUrl, regex).Groups[1].Value : toMatchUrl;
return left == right;
}
private GetRedirectUrlArgs CheckForDirectMatch(Database db, string requestedUrl, string requestedPath, GetRedirectUrlArgs args)
{
var isMediaRequest = requestedUrl.StartsWith("/-/media") || requestedPath.StartsWith("/-/media");
// Loop through the exact match entries to look for a match.
foreach (var possibleRedirect in RedirectRepository.GetRedirects(db, Constants.Templates.RedirectUrl, Constants.Templates.VersionedRedirectUrl, Sitecore.Configuration.Settings.GetSetting(Constants.Settings.QueryExactMatch)))
{
var redirectFromUrl = possibleRedirect[Constants.Fields.RequestedUrl];
if (isMediaRequest &&
(!IsMediaDirectMatch(requestedPath, redirectFromUrl)
&& !(Uri.IsWellFormedUriString(requestedUrl, UriKind.RelativeOrAbsolute)
&& Uri.TryCreate(requestedUrl, UriKind.RelativeOrAbsolute, out Uri requestedUri)
&& IsMediaDirectMatch(requestedUri.AbsolutePath, redirectFromUrl))))
{
continue;
}
else if (!isMediaRequest
&& !requestedUrl.Equals(redirectFromUrl, StringComparison.OrdinalIgnoreCase)
&& !requestedPath.Equals(redirectFromUrl, StringComparison.OrdinalIgnoreCase))
{
continue;
}
var redirectToItemId = possibleRedirect.Fields[Constants.Fields.RedirectToItem];
var redirectToUrl = possibleRedirect.Fields[Constants.Fields.RedirectToUrl];
if (redirectToItemId.HasValue && !string.IsNullOrEmpty(redirectToItemId.ToString()))
{
var redirectToItem = db.GetItem(ID.Parse(redirectToItemId));
if (redirectToItem == null)
{
continue;
}
var responseStatus = GetResponseStatus(possibleRedirect);
args.RedirectItem = redirectToItem;
args.RedirectStatusCode = responseStatus;
return args;
}
if (redirectToUrl.HasValue && !string.IsNullOrEmpty(redirectToUrl.ToString()))
{
var responseStatus = GetResponseStatus(possibleRedirect);
args.RedirectUrl = redirectToUrl.Value;
args.RedirectStatusCode = responseStatus;
return args;
}
}
return args;
}
private GetRedirectUrlArgs CheckForRegExMatch(Database db, string requestedUrl, string requestedPathAndQuery, GetRedirectUrlArgs args)
{
// find a match
foreach (var possibleRedirectPattern in RedirectRepository.GetRedirects(db, Constants.Templates.RedirectPattern, Constants.Templates.VersionedRedirectPattern, Sitecore.Configuration.Settings.GetSetting(Constants.Settings.QueryExactMatch)))
{
var redirectPath = string.Empty;
if (Regex.IsMatch(requestedUrl, possibleRedirectPattern[Constants.Fields.RequestedExpression], RegexOptions.IgnoreCase))
{
redirectPath = Regex.Replace(requestedUrl, possibleRedirectPattern[Constants.Fields.RequestedExpression],
possibleRedirectPattern[Constants.Fields.SourceItem], RegexOptions.IgnoreCase);
}
else if (Regex.IsMatch(requestedPathAndQuery, possibleRedirectPattern[Constants.Fields.RequestedExpression], RegexOptions.IgnoreCase))
{
redirectPath = Regex.Replace(requestedPathAndQuery,
possibleRedirectPattern[Constants.Fields.RequestedExpression],
possibleRedirectPattern[Constants.Fields.SourceItem], RegexOptions.IgnoreCase);
}
if (string.IsNullOrEmpty(redirectPath))
{
continue;
}
// Query portion gets in the way of getting the sitecore item.
var pathAndQuery = redirectPath.Split('?');
var path = pathAndQuery[0];
var redirectToItem = db.GetItem(path);
if (redirectToItem == null)
{
if (LinkManager.GetDefaultUrlOptions() != null && LinkManager.GetDefaultUrlOptions().EncodeNames)
{
path = Sitecore.MainUtil.DecodeName(path);
}
redirectToItem = db.GetItem(path);
}
if (redirectToItem != null)
{
var responseStatus = GetResponseStatus(possibleRedirectPattern);
args.RedirectStatusCode = responseStatus;
args.RedirectItem = redirectToItem;
return args;
}
}
return args;
}
private GetRedirectUrlArgs CheckForRulesMatch(Database db, string requestedUrl, string requestedPathAndQuery, GetRedirectUrlArgs args)
{
//pattern match items to find a match
foreach (var possibleRedirectRule in RedirectRepository.GetRedirects(db, Constants.Templates.RedirectRule, Constants.Templates.VersionedRedirectRule, Sitecore.Configuration.Settings.GetSetting(Constants.Settings.QueryExactMatch)))
{
var ruleContext = new RuleContext();
ruleContext.Parameters.Add("newUrl", requestedUrl);
foreach (var rule in RuleFactory.GetRules<RuleContext>((IEnumerable<Item>)new Item[1] { possibleRedirectRule }, "Redirect Rule").Rules)
{
if (rule.Condition == null)
{
continue;
}
var stack = new RuleStack();
rule.Condition.Evaluate(ruleContext, stack);
if (!ruleContext.IsAborted && (stack.Count != 0 && (bool)stack.Pop()))
{
foreach (var action in rule.Actions)
{
action.Apply(ruleContext);
}
}
}
if (ruleContext.Parameters["newUrl"] != null && ruleContext.Parameters["newUrl"].ToString() != string.Empty && ruleContext.Parameters["newUrl"].ToString() != requestedUrl)
{
var responseStatus = GetResponseStatus(possibleRedirectRule);
args.RedirectUrl = ruleContext.Parameters["newUrl"].ToString();
args.RedirectStatusCode = responseStatus;
return args;
}
}
return args;
}
private static ResponseStatus GetResponseStatus(Item redirectItem)
{
var result = new ResponseStatus
{
Status = "301 Moved Permanently",
StatusCode = 301,
};
var responseStatusCodeId = redirectItem?.Fields[Constants.Fields.ResponseStatusCode];
if (string.IsNullOrEmpty(responseStatusCodeId?.ToString())) return result;
var responseStatusCodeItem = redirectItem.Database.GetItem(ID.Parse(responseStatusCodeId));
if (responseStatusCodeItem != null)
{
result.Status = responseStatusCodeItem.Name;
result.StatusCode = responseStatusCodeItem.GetIntegerFieldValue(Constants.Fields.StatusCode, result.StatusCode);
}
return result;
}
}
}
  1. Configuration in Sitecore:
    • Define redirects within the Sitecore content tree.
    • Utilize the Redirect Map feature to manage redirects centrally.
  2. Dynamic Redirects with Custom Code on the .net core rendering host:
    • Implement custom logic for dynamic redirects based on user behavior or external factors.
    • Ensure flexibility in adapting to evolving business needs.

Here you have several option, however the idea is to check that the layout service is returning a redirect item checking the appropriate template ID and process the redirect as per Sitecore instruction respecting if it is a permaent redirect and the target configured in Sitecore…

This code show how to check for the TemplateId returned by the layout service and how to “implement” and respect the redirect configured on Sitecore…

namespace XXXCUSTOM.Middleware
{
using Microsoft.AspNetCore.Http;
using Sitecore.AspNet.RenderingEngine;
using Sitecore.LayoutService.Client.Response.Model;
using Sitecore.LayoutService.Client.Response.Model.Fields;
using System.Threading.Tasks;
public class RedirMiddleware
{
private const string RedirectTemplateID = "XXXX-XXXX-XXXX-XXX-XXXX";
public RedirectMiddleware(RequestDelegate next)
{
_next = next;
}
public async Task InvokeAsync(HttpContext context)
{
var custrequest = context.GetSitecoreRenderingContext();
var custroute = custrequest.Response?.Content?.Sitecore?.Route;
if (custroute == null)
{
await _next(context);
}
if (!IsRedirect(route, context))
{
await _next(context);
}
}
private bool IsRedirect(Route route, HttpContext context)
{
//RUN Redirect LOGIC!!!
if (route == null)
{
return false;
}
if (route.TemplateId != RedirectTemplateID)
{
return false;
}
var isPermanent = false;
var redirectType = route.ReadField<ItemLinkField>("Response Status Code");
if (redirectType != null)
{
if (redirectType.Url != null)
{
if (redirectType.Url.Contains("301"))
{
isPermanent = true;
}
}
}
var redirectTextField = route.ReadField<TextField>("Redirect To Url");
if (!string.IsNullOrEmpty(redirectTextField.Value))
{
context.Response.Redirect(redirectTextField.Value, isPermanent);
return true;
}
var destinationField = route.ReadField<ItemLinkField>("Redirect To Item");
var destinationUrl = destinationField?.Url;
if (!string.IsNullOrEmpty(destinationUrl))
{
context.Response.Redirect(destinationUrl, isPermanent);
return true;
}
return false;
}
}
}

Best Practices for Redirect Management:

  1. Regularly Audit and Update Redirects:
    • Keep the redirect map up-to-date to reflect changes in content and URL structures.
  2. Test Redirects Thoroughly:
    • Conduct comprehensive testing to ensure redirects function as intended across various scenarios.
  3. Monitor and Analyze Redirect Performance:
    • Utilize analytics tools to monitor the impact of redirects on user behavior and site performance.

Conclusion:

In the dynamic landscape of Sitecore Headless with .NET Core Rendering Host, redirects serve as the guiding beacons that shape the user experience. By understanding the nuances of redirects and implementing them effectively, developers can ensure that users seamlessly navigate the digital terrain, enhancing engagement and satisfaction. As technology continues to advance, mastering the art of redirects in Sitecore Headless remains a crucial skill for crafting compelling and user-friendly web experiences and to keep your clients happy with the existing Redirects 🙂

Demystifying Cookie Handling in Sitecore Headless Rendering Host for .NET Core

Introduction

Sitecore Headless, a decoupled approach to content management, has revolutionized the way digital experiences are built and delivered. Its rendering host, a .NET core application, serves as the front-end gateway to Sitecore’s content repository, providing a seamless interface for rendering content and managing user interactions.

Cookies, ubiquitous in the digital landscape, play a crucial role in tracking user behavior, maintaining personalization preferences, and enabling authentication. In the context of Sitecore Headless, handling cookies within the rendering host requires careful consideration to ensure consistent user experience and to achieve functionalities between the Rendering Host and Sitecore Content Delivery server.

Cookie Handling Strategies

Several strategies can be employed to effectively manage cookies within the Sitecore Headless rendering host:

  1. Cookie Sharing: Configure the Sitecore instance and the rendering host to share the same cookie domain. This allows the rendering host to access and modify cookies set by the Sitecore instance, ensuring consistency across the user experience.
  2. Cookie Forwarding: Implement proxy settings that forward cookies from the rendering host to the Sitecore instance. This approach enables the Sitecore instance to track user behavior and maintain personalization preferences even when requests originate from the rendering host.
  3. X-Forwarded-For Header: Utilize the X-Forwarded-For header to provide the visitor’s IP address to the Sitecore instance. This information is crucial for accurate analytics and personalization, especially when proxy servers or load balancers are involved.
  4. Cookie Synchronization: Implement a mechanism to synchronize cookies between the rendering host and the Sitecore instance. This ensures that both systems maintain a consistent view of the user’s cookie state, preventing inconsistencies and potential errors.

Compliance Considerations

As with any cookie-handling practice, adhering to privacy regulations is paramount. The rendering host should implement appropriate mechanisms to inform users about cookie usage, obtain consent whenever necessary, and provide options for managing cookie preferences.

Technical Challenges & Workarounds

Within some circumstances it is not “practical” to share custom application cookies between the rendering host and Sitecore Pipelines / Content Resolvers therefore what you would “traditionally” manage with an application Cookie on the Content Delivery in the headless paradigma you would need to split the logic across the rendering host and the Sitecore Pipeline.

Within this code example I show you how to pass value between a cookie on the rendering host and an http header within the Sitecore pipeline.

SitecoreLayoutRequest sitecoreLayoutRequest = _requestMapper.Map(httpContext.Request);
string cookieValueFromContext = _httpContextAccessor.HttpContext.Request.Cookies["_XXXX_trk"];
if (!string.IsNullOrEmpty(cookieValueFromContext))
{
sitecoreLayoutRequest.AddHeader("XXXX", new string[] { cookieValueFromContext });
}
and once you are in the Sitecore Pipeline you can read your code from the header and use it to run IdentifyAs or any other Sitecore XDB related code….
if (HttpContext.Current?.Request?.Headers.AllKeys == null)
{
return null;
}
var customCookie = HttpContext.Current?.Request?.Headers["XXX"];
var result = ContactIdentificationManager.IdentifyAs(new KnownContactIdentifier("Salesforce.ContactId", customCookie));

Sitecore 404 handling in an Headless .net core application

Within a .net core Sitecore Headless implementation 404 is an important topic and probably any project require some code to handle it, within this post I am explaining how to implement in a simple way…

There are two elements to configure and to pay attention:

  1. Rendering Host customisation

you will need to create a Sitecore controller that’s a catch all controller for all the request to the layout service, here you can find a simple implementation

namespace XXXX.Controllers
{
using Microsoft.AspNetCore.Mvc;
using Sitecore.AspNet.RenderingEngine;
using Sitecore.LayoutService.Client.Exceptions;
public class SitecoreController : Controller
{
public IActionResult Index()
{
var request = HttpContext.GetSitecoreRenderingContext();
if (request == null || request.Response == null)
{
return new EmptyResult();
}
//Check if layout service call return any error
if (request.Response.HasErrors)
{
//loop through errors
foreach (var error in request.Response.Errors)
{
switch (error)
{
//this is the case of 404 errors
case ItemNotFoundSitecoreLayoutServiceClientException _:
Response.Redirect("/404");
break;
}
}
}
return View();
}
}
}

2. Content Delivery / Layout service configuration

Here no customisation is required and if you are happy to have a simple implementation, nothing to do to customise it the rendering host, obviously in most sitecore implementation you may have Redirects / Item Resolvers and custom errors pages on SXA to play a role…

3. Content authoring

Within most of Sitecore implementation you will have an item called 404 defined on the root of the site so that Conent Editors can customise the 404 page to serve to customers…

Limitations

this code sinppets is very simple and may not suit you well within your implementation, as an example not all the customer want to call the Page not found 404 and this approach will support the same name for page not found item for multiple site…. Just to clarify if you have 10 sites, all the 10 sites will be forced to call the PageNotFound page as 404 but obviously each site could have different content to show for 404 page….

Other extension to this code could be to set the status code of 404 page, some SEO expert reccomend do it, others do not consider it mandatory…

Sitecore Conditional Renderings Rules aka custom Personalization rules

One of my favorite feature of Sitecore is the ability to create complex business rules to serve dynamic & personalised content to end users.

This functionality is available on almost all the version from Sitecore 6 unitl Sitecore 10 and it helped clients to deliver elegant solutions and deliver personalised experiences. Note that there are some limitations/differences in the XM Cloud version.

As you probably know on presentation details you can personalise renderings and have a set of predefined rules defined as conditional renderings. Within this post I will explain how you can extend the rules conditions so that you can and create your own custom rules to deliver personalised content to targeted users.

Within my example I am creating a custom rule to extend Salesforce personalisation, my hypotetical usecase is the following one, I want to display a personalised banner to customers enrolled in a custom Salesforce campaign and only for customers who have a specific cookie….

Steps to create your custom Rule

Create the element and point towards your Class / Assembly

Element got created in a folder under: /sitecore/system/Settings/Rules/Definitions/Elements/

Define the tags so that your rule will show in the correct category and in the right place

Create a Tag

Assign the tag to the conditional renderings

Implement your custom c# class to execute your business logic

this is the core of the logic to evaluate the rule, you can check external service, cookies, querystring or whatever custom code you need to implement (within my Salesforce extension I am checking some XDB facets but that’s not very useful to this post…)

Within the code, you can have your custom logic to check a specific cookie and XDB facet value and return true or false to evalute the rule just as an example…

using Sitecore.Analytics;
using Sitecore.Analytics.XConnect.Facets;
using Sitecore.Diagnostics;
using Sitecore.Rules;
using Sitecore.Rules.Conditions;
using Sitecore.XConnect;
using Sitecore.Xdb.Configuration;
using System.Collections.Generic;
using System.Linq;
namespace XXXX.Foundation.XConnect.Rules
{
public class SalesforceCustomCampaign<T> : StringOperatorCondition<T> where T : RuleContext
{
public string CampaignValue { get; set; }
protected override bool Execute(T ruleContext)
{
Assert.ArgumentNotNull(ruleContext, "ruleContext");
Log.Info($"[SalesforceCustomCampaignRule] EvaluatingRule", this);
/*Add your custom logic to return true if the rule is satisfied and false if it is not
eg. check cookies, querystring or any other fancy code you need…
*/
return false;
}
}
}

Once you have everything configured you can publish the items created and test your new rule in action

further reference on Custom personalised rules can be found here:

Sitecore- How to Create Custom Personalization Rules | Valtech

How to personalize callouts based on triggered goals in Sitecore (techguilds.com)

Personalization | Sitecore Documentation

Sitecore XDB -Moving Shard database across environments

I have recently been involved with some tasks to migrate the XDB database across different environments and I have discovered few interesting things about XDB shard databases that I did not know about it….

First and more important things to know, the shard database from Sitecore 9 onwards is supported by 3 databases:

  1. Shard Management
  2. Shard 0 DB
  3. Shard 1 Db

Shard database is used for the XDB collection – meaning that XDB and shard databases hold all customers data and interactions assuming that you have tracking enabled within your sitecore instance…

In case you are not aware this documentation explain well what is sharding and how it works and why it is required, long story short Sharding is a tecnique to increase scalability of your SQL database for non relational data structures… https://azure.microsoft.com/en-gb/resources/cloud-computing-dictionary/what-is-database-sharding#:~:text=Database%20sharding%20is%20a%20type,server%20instance%20to%20spread%20load.

SQL Scripts

From a sitecore Admin prospective what you need to know is that if you want to move a shard database across your sitecore environments you need to move the databases and once you have moved the databases in a new environment you need to remind to update the Shard management database (typically the naming is such as XXXXXXXX-smm-db in [__ShardManagement].[ShardsGlobal] table where the connection to the other shard database is kept.

This SQL script is basically helping you to amend the server and database name

update [__ShardManagement].[ShardsGlobal] set databasename='XXXX-shard0', servername='XXX-xp-rg-sql' where databasename='XXXXX-shard0-db'
update [__ShardManagement].[ShardsGlobal] set databasename=XXXX-shard1-db', servername='XXXX-xp-rg-sql' where databasename='XXXXX-shard1-db'

SOLR configuration

once you have updated your SQL connection string you have to updated SOLR XDB index to inform Solr of the change of the Shard configuration since Solr hold a cache to the shard databases…

The simplest way is just deleting the XDB-INDEX-TOKEN document that hold the connection string posting the following command on the SOLR XDB and XDB rebuild index

<delete><query>id:xdb-index-token</query></delete>

XDB Search Index Rebuild

Finally remember to deploy in different environment any custom XDB facets and you are ready to retrigger your XDB index rebuild from the indexing service using the following command from a kudu console

Sitecore.XConnectSearchIndexer.exe -rr

Here there is further documentation for XDB index rebuild in case you have no luck or missed any of the above steps

https://doc.sitecore.com/xp/en/developers/103/sitecore-experience-platform/rebuild-the-xdb-index-in-solr.html

Sitecore Content Hub Chrome Extensions

Working with Content hub you will soon realise that you need some help within your browser to remember and navigate all the public urls and management tools

Therefore within Sitecore community there has been a prolification of Chrome extension to facilitate the life of Content hub developers

Sitecore official chrome extension:

How does it look:

favourite features:

ENTITY LINK- it redirect you to the entity detail json, very useful to debug and troubleshoot custom asset detail pages.

all the other features are also useful as a dynamic bookmark and to save you few clicks.

Alternative Chrome Extensions worth considering…

Digital heard CH Extension

https://chrome.google.com/webstore/detail/digital-herd-sitecore-con/amdgcnfnmfeejdmdjokajkklaeacdlek

Content Hub Power Extension

https://chrome.google.com/webstore/detail/content-hub-power-extensi/mhhfhpbdecmbipmbnphdbpnaldamcmac

Sitecore PowerShell script to export to Excel

This is a powerful Sitecore Powershell snippet that I found extremely useful and that I wanted to share with you.

The goal of this script is to export in Excel an SPE list of objects (Sitecore query)

https://gist.github.com/steliodibello/0886482f6cb2daf778b49f11d229a645.js

further documentation and credits for this function to the SPE team https://doc.sitecorepowershell.com/appendix/common/out-download